- Confirm Your Account
Once you register for a Sales Prophet account, you will be sent a confirmation email. Depending on the security settings of your email account, these confirmation emails often land up in the spam or quarantine folder. If that happens, please move that email to your inbox and click on the confirmation link. Now your Sales Prophet account is ready to use. - Go to Your Profile
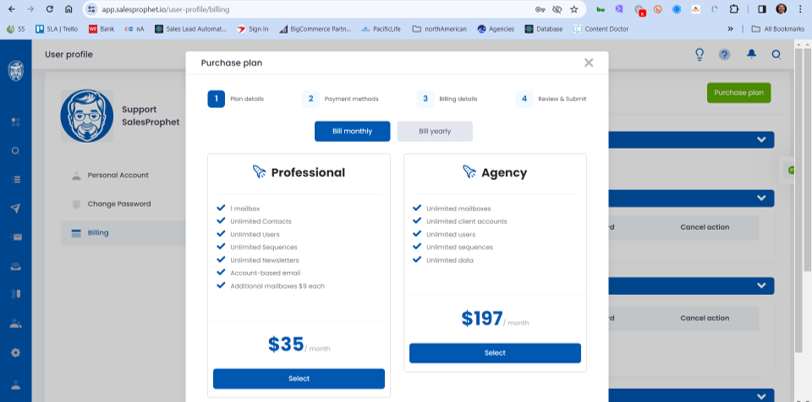
Log into your Sales Prophet account and go to your profile (Bottom Left sidebar) and click on billing. Then select your plan otherwise you can’t do anything in the app. You have two options a Professional plan and an Agency plan.
The Professional Plan only includes one Sales Prophet account with one email account, but you can add as many emails accounts as you like for $9 each. Unlimited users/team members are included. You only pay for additional email accounts. This plan is ideal for a single company.
The Agency Plan includes unlimited accounts, email accounts, and users/team members. This plan is ideal for lead generation and marketing firms who manage multiple accounts/clients and need unlimited users, team members, and email accounts to support their lead generation efforts.
- Add an Email Account
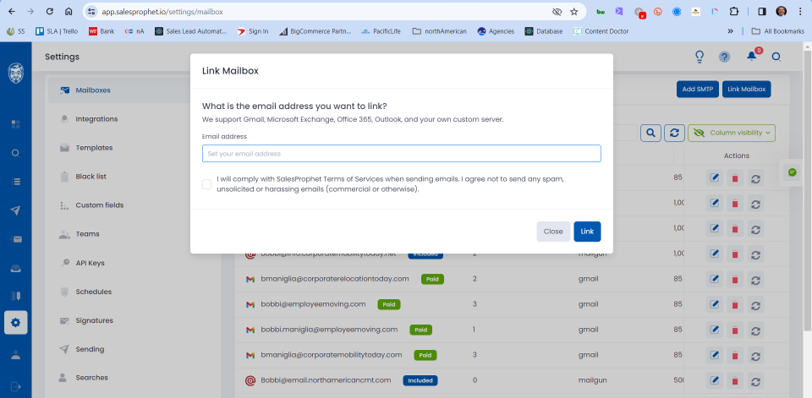
Once a plan is picked, its time to add an email account that you want to use to send emails from. You simply go to settings and click on Mailboxes at the top of the page.We have two main connection options for setting up email accounts.
A. One-click integration with Google or Microsoft email accounts.
Simply select Link a Mailbox and Sales Prophet will ask you to log into your Google or Microsoft email account and allow Sales Prophet to connect. There is no need to worry about creating application passwords since we have already gone through the security audits with Google, Microsoft, and PWC. Sales Prophet is an Open Authorized (OAuth) application. You can watch a video about connecting your email account here
B. You can also connect to your email accounts via SMTP.
This is ideal for people who want to send email using a subdomain i.e., info.yourdomain.com vs. sending from yourdomain.com
This way if you happen to damage your subdomain or get blacklisted, you can create a new subdomain and be back up and running in minutes. Plus, all of your digital assets i.e., email headers, footers, images, and signatures remain in the same application with no need to switch to a new platform.We have direct API integrations with Mailgun, Sparkpost (Now Message Bird), and SendGrid. This makes it very easy to connect to one of these third-party SMTP providers. You can watch a video on how to connect to a third-party SMTP provider here.

Most customers purchase a new domain similar to their main domain when it comes to launching a sales automation program. This protects their company’s main domain.
For example, if your domain is MyMovingCompany.com you might want to purchase a new domain MyMovingCompanyServices.com. Then you purchase an email account or more using that new domain.
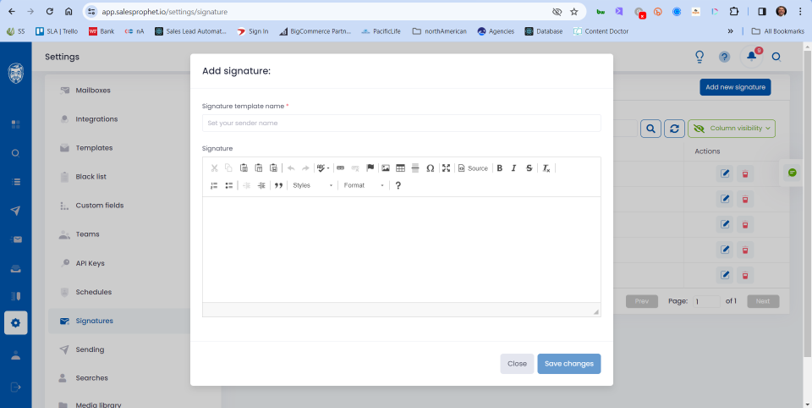
- Create an Email Signature
Go to Settings and select Signatures. Then click on add a new signature.
You can add as many signatures as you like. We recommend testing multiple signatures Text Only, Text with Headshot, Text with Headshot and Company Logo, Text with Headshot, Company Logo, and social media links, etc.
You must size your logos and images to the correct size for best results. Headshots should be around 125 pixels at 72 dpi or less in width. Logos should be under 400 pixels at 72 dpi wide.
You can watch a video on how to set up your email signatures on our YouTube Channel here

- Setting Your Email Sending Limit
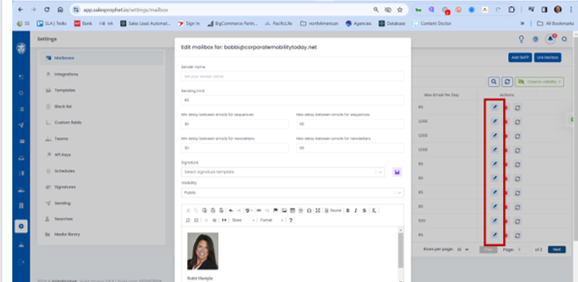
Now that you have added an email account (or email accounts) it’s time to set your email sending limit. Click on the pencil icon (See red box) next to your email account under settings. A box will appear with your sending limits. You will notice there is a delay between email sends. Our system by default sends one email at a time from 30 seconds to 90 seconds for best email deliverability. You can adjust these settings with 30 seconds being the minimal delay or 30-60 seconds.
This setting is very important because if you send too many emails from a new email account, you can damage that email’s reputation and deliverability.
We recommend setting a limit of 25 a day or less for new email accounts that haven’t been used before and slowly ramping up your volume over time.
For emails that you have been using for some time and that have already been warmed up, we recommend setting your email limit to under 100 a day. If you are using an email warming solution like Warmupinbox, you can increase your volume but still recommend not sending over 150 emails a day from any Google or Microsoft email account.
If you need to send a volume of emails, consider adding a third-party SMTP service like Mailgun, Sparkpost, or SendGrid. If you add one of these services emails can be sent in larger batches throughout the day for higher email sending volumes.
- Adding Your Unsubscribes and Suppression Lists
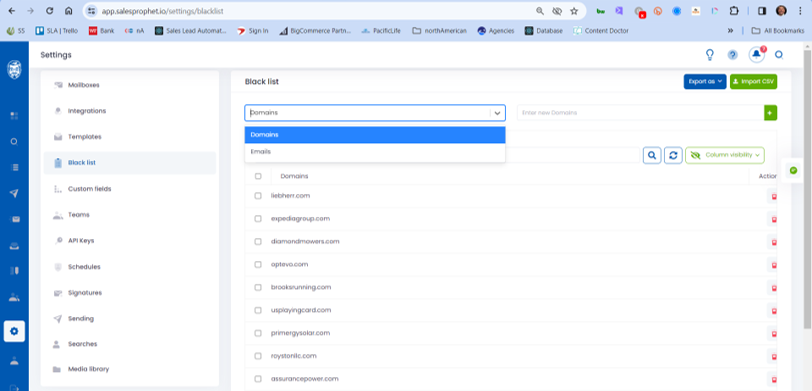
If you we doing any email marketing previous to using Sales Prophet, chances are you have a list of people who have unsubscribed or opted out of your email campaigns. To maintain Can Spam Act compliance, you are legally obligated to remove those people from receiving any new email campaigns from your company. So you need to upload those email addresses into Sales Prophet. Simply go to settings and click on Black List. (See image below)

Then upload a single-column CSV file with just the email addresses of those people you want to receive from getting your email campaigns. Sales Prophet will remove any matching email addresses we have in our database from ever receiving your emails.
Suppression Lists You repeat this process to suppress any companies and contacts you don’t want to email. For example, you might not want to email existing customers, competitors, partners, resellers etc. Simply create another CSV file with just the domains of those companies.

Notice how we just want the domain. Don’t upload domains with HTTP, HTTPS, or WWW. We just want the domain. Sales Prophet will automatically suppress any emails with that domain. For example: if you add Microsoft.com because you don’t want to market to anyone at Microsoft or they are already a customer, Sales Prophet will not allow you to add any contacts with an email @microsoft.com to any campaign. We also have a video on our YouTube channel you can watch here.

- Creating Sending Schedules
Now it is time to tell Sales Prophet when you want to send your emails. This is very important if you have regional sales teams with different time zones or multiple locations or target accounts around the world.
Instead of having to create a schedule for each campaign, Sales Prophet gives you the ability to save schedules and add them to your campaigns with one click saving you a lot of time.
Go to settings, click on schedules, select your times, then give your schedule a name and hit save as a template.
